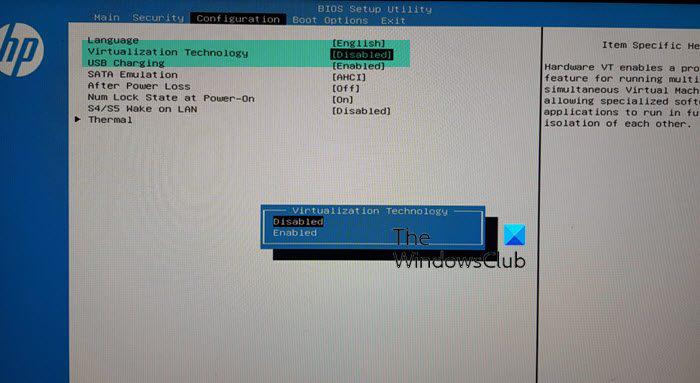
Hardware Virtualization, also called Platform, Server virtualization is the virtualization of computers as complete hardware platforms. In this post, we will show you how to enable or disable Hardware Virtualization in Windows 11/10, via the BIOS settings.
Disable or Enable Hardware Virtualization in Windows 11/10
While most recent PCs support hardware virtualization, not all computer vendors enable this feature as shipped from the factory. The setting may be called VT-x, AMD-V, SVM, Vanderpool, Intel VT-d or AMD IOMMU if the options are available.
If you are unable to find the Virtualization settings in your BIOS it may mean that your PC does not support it. Nevertheless, you can check if your Windows 10 PC supports HAV.
If your computer doesn’t offer any options to access its BIOS before your OS loads then it is possible that it uses UEFI instead. On a UEFI-based computer, there is often no button press prompt before the OS loads. Instead, you will access these settings from within the OS.
For a Windows system; hold down the Shift key as you click Restart in Windows to reboot straight to that menu. To access the UEFI Firmware Settings, click the Troubleshoot tile, select Advanced Options, and select UEFI Firmware Settings. Click the Restart option afterward and your computer will reboot into its UEFI firmware settings screen.
Different MOBOs use different BIOS configurations – so to enable or disable Hardware Assisted Virtualization (HAV) on your Windows 10 device, you can see the sections below for a list of the most common computer manufacturers and information regarding accessing the BIOS settings for each PC manufacturer.
Acer
Most commonly: F2 or Delete.
On older computers: F1 or the key combination CTRL+ALT+ESC.
Asus
Most commonly: F2.

Alternatively: Delete or Insert key, and less commonly F10.
DELL
Newer models: F2 key whilst Dell logo is on screen.
Alternatively: F1, Delete, F12, or F3.
Older models: CTRL+ALT+ENTER or Delete or Fn+ESC or Fn+F1.
HP
Most commonly: F10 or ESC.
Alternatively: F1, F2, F6, or F11
On HP Tablet PCs:F10 or F12
Lenovo
Most commonly: F1 or F2
Older hardware: the key combination CTRL+ALT+F3 or CTRL+ALT+INS or Fn+F1.
Enabling VT-x in ThinkPad (Tablets/Convertibles/Notebooks):
Enabling VT-x in ThinkCentre (Desktops):
Sony
Sony VAIO:F2 or F3
Alternatively: F1
If your VAIO has an ASSIST key, try to press and hold it while you power on the laptop. This also works if your Sony VAIO came with Windows 8.
Note: The location of the Assist button will be different depending on the computer model. Refer to the operating instructions supplied with the computer for the exact location of the Assist button on your model.
Toshiba
Most commonly: F2 key.
Alternatively: F1 and ESC.
Toshiba Equium: F12
Hope you find this post informative enough!
Read next:


