The Legend of Zelda: Skyward Sword
’s Skyview Temple is deep in Faron Woods. Now that we’ve upgraded our shield, we’re better prepared to tackle it.
In this
Skyward Sword HD
Faron Woods walkthrough, we’ll guide you through this area with tips on finding items, rupees, and collectibles and completing every quest and side quest. We’ll walk through the entire dungeon and help you find the
Dungeon Map
as well as the
Small Keys
and
Golden Carving
key items you’ll need. We’ll pick up a new tool, the
Beetle
, and fight two minibosses, a
Stalfos
and
Staldra
, on our way to face this dungeon’s boss,
Demon Lord Ghirahim
.
Table of contents
Skyview Temple Dungeon Map
Right room
Left room
Small Key 1
Stalfos miniboss
Use the Beetle
Small Key 2
Staldra miniboss
Golden Carving
Demon Lord Ghirahim
Skyview Spring
Skyview Temple Dungeon Map
Image: Nintendo via Polygon
As you approach Skyview Temple, look above the (locked) door for a pink crystal. Shoot it with your slingshot to open the door and enter the temple. Save at the bird statue inside.
Graphic: Jeffrey Parkin | Sources: Nintendo via Polygon
Hack through the spiderwebs as you head down the hall. You’ll eventually come to a vine-covered ledge with a Deku Baba at the top. Stun it with your slingshot, and then climb up. Whack the crystal there to unlock the door.
Image: Nintendo via Polygon
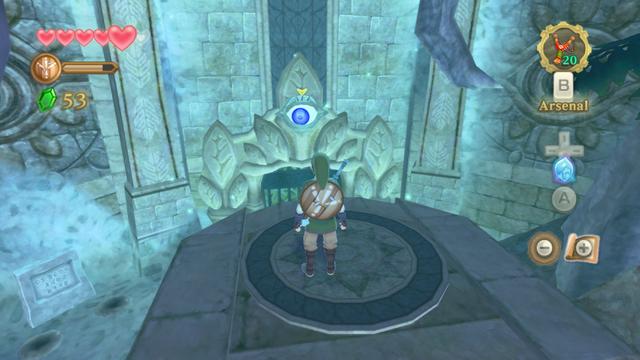
In the next room, approach the eye-lock — an
Eye Guardian
— and target it. Pull out your sword, and move it in a big circle a few times to make the eye dizzy. It’ll fall off the door, an you can proceed.
Head through the door that opens and save at the next
bird statue
. Climb the vines on the wall you just entered through. At the top, smash through the wooden barricades to open a shortcut.
Walk forward and deal with the
Green Bokoblin
.
Right room
Graphic: Jeffrey Parkin | Sources: Nintendo via Polygon
Face right, and shoot the crystal over the door to unlock it. Head through.
Image: Nintendo via Polygon
Hack through the spiderweb and follow the path until a
Skulltula
— a giant spider — drops in front of you. Hit it with your sword to spin it around, and then stab forward into its exposed crystal belly.
Read the plaque
to get a clue about where the next crystal is.
Drop off the walkway to the left, and look for a low tunnel in the wall facing east. Crawl through, and shoot the crystal on top of the statue. Use the vines to climb out of this chamber, and then return to the main room.
Left room
Graphic: Jeffrey Parkin | Sources: Nintendo via Polygon
Drop off the walkway, and cross the room heading west.
Image: Nintendo via Polygon
There’s a purple crystal under the door. Shoot it, and then climb up to go through the door.
Deal with the next Green Bokoblin, and then stand to the right of the Skulltula on the web.
Image: Nintendo via Polygon
Use your Slingshot to knock down the two vines, and swing to the other end of the room.
Hack your way back across the main bridge to clear out the Skulltulas. About halfway across the bridge, face west to spot another purple crystal. Shoot it to fill the rooms with water.
Graphic: Jeffrey Parkin | Sources: Nintendo via Polygon
Head through the door in the south.
Image: Nintendo via Polygon
Back in the main room, step off the balcony and onto the tree branch on your left. Open the
chest
there for the
Dungeon Map
.
Small key 1
Graphic: Jeffrey Parkin | Sources: Nintendo via Polygon
Drop to the main walkway. Look for a floating log on your right. Use it to climb up the vines on the eastern wall. Head through the door in the upper corner of the room.
Image: Nintendo via Polygon
Deal with the Skulltula, and then face the two
Eye Guardians
. Stand about where the Skulltula was so that both eyes are open. Pull out your sword and make a few big circles again. Once they both drop off, open the
chest
for a
Small Key
.
Back in the main room, use the Small Key to unlock the door leading north.
Stalfos miniboss
Graphic: Jeffrey Parkin | Sources: Nintendo via Polygon
In the next room, there’s a
bird statue
off to the left. When you’re ready, shoot the crystal over the door, and head into the dome in the center of the room.
Image: Nintendo via Polygon
This
Stalfos
waiting for you has two two swords. Your goal is to keep attacking from one of the directions it’s not currently guarding.
Image: Nintendo via Polygon
If you can, match a
Shield Bash
to one of its attacks — like a parry. This will stun it for a few seconds (and make its arms fall off), giving you time to land several hits in a row.
When it’s defeated, open the
chest
that appears to pick up the
Beetle

— a drone you’ll wear on your wrist.
Image: Nintendo via Polygon
Fly it through the hole in the dome, and pilot it into the crystal over the door to get back outside.
Use the Beetle
Take a few minutes to get used to the Beetle.
Fly around the large, circular room collecting everything you can and cutting down crates. There are several half-circle tunnels around the room where you can pick up a few more
rupees
.
Image: Nintendo via Polygon
On the left (west) side of the room, there is a purple crystal in the tunnel. Crash the Beetle into it to open the door on the left.
Small Key 2
Graphic: Jeffrey Parkin | Sources: Nintendo via Polygo
nInside, drop into the hallway, cross to the other end, and head through the next door.
Walk into the room. A Skulltula will drop from the ceiling. Hit it with an uppercut (or just hit it several times) to knock it over, and then deliver a
Fatal Blow
to kill it.
Image: Nintendo via Polygon
Facing the three Eye Guardians, turn around to your right. Climb up the vines and use the
Beetle
to cut down both crates — one has some hearts inside, and the other doesn’t break. Shove the metal crate off the balcony.
Image: Nintendo via Polygon
Push that crate forward and into the center of the room. Keep pushing it forward until the left and right Eye Guardian open up. Climb on top of the crate and all three Eye Guardians should be looking at you.
Pull your sword and make them dizzy to unlock the gate. Open the
chest
inside for the next
Small Key
.
Graphic: Jeffrey Parkin | Sources: Nintendo via Polygon
Head back into the hallway. Use the Beetle to fly up along the roof. Dodge around the Skulltula and trees to crash into the crystal. This fills the hall with water.
Image: Nintendo via Polygon
Climb up the stairs on the left, and hack your way back along the hall. Watch for glowing tree trunks — there’re
rupees
hidden inside. At the end of the hall, hack through the trees and crawl through the tunnel there.
Image: Nintendo via Polygon
There’s a tightrope on the east side of the main room, but there are Dekus Baba on the ceiling. Use your Beetle to cut their stems and kill them. Cross the tightrope and unlock the door.
Staldra miniboss
Graphic: Jeffrey Parkin | Sources: Nintendo via Polygon
Smash through the two wooden barricades to meet a
Staldra
.
Image: Nintendo via Polygon
The only trick to this fight is to hit all three of the Staldra’s heads at once. Wait until they’re lined up, and hit them all with a horizontal slash. That’s it.
Golden Carving
Graphic: Jeffrey Parkin | Sources: Nintendo via Polygon
Head through the door and follow the ledge. Use your Beetle to cut down the Skulltula. Jump across and take the first right. Bait the Bokoblin onto the tightrope and knock it down.
Image: Nintendo via Polygon
Cross the tightrope and turn left. Open the chest there for a
red rupee
. Turn around and visit the
bird statue
.
Past the bird statue, climb the vines in the next room. Turn right again to find a rope tied to the ledge. Use the rope to swing to the tree in the center of the room.
From the tree, shoot the two vines on the west side of the room. Jump to them, and swing to your left. Open the chest there to find the
Golden Carving
.
Image: Nintendo via Polygon
Take this back to the big door next to the tightrope and bird statue. You’ll have to maneuver it around a bit until it will fit into the lock.
Demon Lord Ghirahim
Image: Nintendo via Polygon
After a lengthy villain monologue, you’ll face off against Ghirahim in a boss fight. There are two phases.
Phase 1
The first phase of this fight isn't actually dangerous. Ghirahim will walk at you holding his hand out. He’ll match where his hand is to where you’re holding your sword and catch it if you swing.
Image: Nintendo via Polygon
The trick is that he takes a second to block. Hold your sword to the right, and he’ll move his hand to your right. Quickly, but without swinging, move your sword to the left. Before he has a chance to block, swing from the left to hit him.
You’ll have to do this several times.
Phase 2
After enough hits, he’ll summon a sword and the real fight starts. He’s got three moves during this phase.
Image: Nintendo via Polygon
His first move is to summon a line of glowing
daggers
that fly at you. You can block these or bounce them back with a Shield Bash, you can swing your sword in a matching line to knock them away, or you can just walk out of the way.
Occasionally, he’ll teleport next to Link. If you’re quick, you can sneak in an attack around his sword, but you have to make sure he can’t block it. If he does block, he’ll counterattack and hit you.
Image: Nintendo via Polygon
His most dangerous move is to lean forward and dash at you. There’s a long windup to this, so it’s easy to spot. He’ll swing as he passes you with a devastating strike. It’ll damage your shield a lot if you block, and it’s hard to get away from.
The best way we found to deal with this is to
Shield Bash
him right when he gets to you. This will stun in for a few seconds and you can land at least a couple hits.
Keep doing this until he gets bored and ends the fight. You’ll get a
Heart Container
for your trouble.
Skyview Spring
After the fight, head through the door to Skyview Spring. Head forward to the altar, but don’t interact with it yet.
Image: Nintendo via Polygon
Hop into the water and loop around to the back side of the altar to find a
Goddess Cube
. This one activates a
Goddess Chest
on
Pumpkin Landing
(we’ll get to it in a minute).
Head back around to the front and
Skyward Slash
the altar. You’ll get a lot of exposition and an ice dancing routine from Fi, and then you’ll pick up the
Ruby Tablet
.
Backtrack out to a bird statue and return to the sky. Return to
Skyloft
and land near the
Statue of the Goddess
. Place the Ruby Tablet to unlock the next pillar of light.
We’ve got a little running around to do before we head there, though.


